Tuesday, December 31, 2013

Last Minute Take on December Blue Fern Sketch

The end of the month is generally my play time, when all my DT projects are done and I haven't yet started on the next month's projects. And though my DT position with Blue Fern Studios doesn't start for another day, officially (ok, in reality a number of hours, LOL), I couldn't resist playing along with the December sketch.


I don't take a lot of Christmas photos. I always mean to, but in the excitement of Christmas morning it never happens. Or when it does, the photos are chaotic. So instead of using a Christmas tree, I substituted the larger of the Creepy Trees, and paired it with this darling photo of my friends' daughter buried in leaves.


I treated the tree with crackle paint, and once it was dry sprayed it with brown and black mist to accentuate the crackles. Didn't it give it a lovely shimmer in the process?


For the Shabby Brick Bits, I wanted to achieve a lacquered effect. I started by colouring the piece with a black Gelato, then went over the whole thing with Glossy Accents.


And some Shimmerz flicks to finish everything off.


 I just had to mention, too, that the Messy Head Papers from 7 Dots Studio were designed by fellow incoming Blue Fern Studios Design Team Member Olga Heldwein.

Not much time left to play along, but fear not, the January sketch goes live tomorrow. Play along for your chance to win some Blue Fern Studios chipboard!


Supplies Used:

Blue Fern Studios Chipboard

Creepy Trees
Shabby Brick Bits

Other

Prima Brick stamp
Crafter's Workshop 6x6 Brick stencil
13 Arts Ayeeda Gesso
Shimmerz Spritz: Bed of RosesSeafoam and Truffle
13 Arts Peal Mist: Black
Tim Holtz Vintage Photo Crackle Paint
Shimmerz Shimmerz: Tickle Me Turquoise and Jilted Jade

Saturday, December 28, 2013

A Wintery Tag Card

Just stopping in for a quick share tonight of another Christmas card I whipped up at the last moment.

I love how versatile Blue Fern Studios chipboard is for layering. To make this partridge in a pear tree tag card I combined Distress Stains and Inks on the background, then added some stamping and rub-ons.

I painted the tree and bird with liquid acrylic paint, then brushed some gesso onto the tree with a dry fan brush and added some brown lowlights to the bird.


For the moon in the background I used the smallest of the Blue Fern Graduated Circles painted with gesso. I adhered it to the page and then painted the inside with embossing ink and filled it with a luminous embossing powder - the photos don't do the shimmer justice.


I hope you had a wonderful Christmas!

Monday, December 23, 2013

Last Minute Christmas Card

Hello bloggers! I don't know about you, but I'm a teensy bit behind on my Christmas preparations this year. I had all the best intentions, but... As I was wrapping presents the other night I was also forced to make a couple cards and tags on the fly. Most of them were not works of art (after all, most of the kids in the family aren't even going to look at the tags other than to check for their name), but I spent some extra time to make this one for my dad and stepmom since it will hold the Michael Buble tickets we bought them.


It is a card made from 2 tags glued together at the top - a super easy way to transform your tags into cards. The background is a mixture of Distress Stains and Glimmer Mist.


The gorgeous Shabby Flakes chippies are from Blue Fern Studios, and make such a perfect focal point for a tag, don't you think? I treated them simply with Weathered White embossing powder from Ranger for a textured finish. 


I used the same colors of Distress Stain and Glimmer Mist to stain the seam binding ribbon.

Thanks for stopping by today. I wish you and your family a very Merry Christmas and all the best for 2014!

Monday, December 16, 2013

Save the Date - Flying Unicorn Christmas Party December 18th!


Join the Flying Unicorn for our annual Christmas party - games, giveaways - you want to be there!

Sunday, December 15, 2013

Mid-Month Art Journal Challenge at the Flying Unicorn

Can you believe it's December 15th already? I know we say this every year, but where has the year gone? This month is a special one for the Mixed Media/Art Journal challenge on the Flying Unicorn Forums; the challenge was born January 1st, 2013, and this marks one full year of art journalling challenges. Whenever a new challenge debuts it's a waiting game to see if it will catch on. The members embraced this challenge right from the word go, and it has stayed one of our most active challenges every month. The quality of art that is being submitted, and the variety of styles, is absolutely mind-blowing, and I find myself constantly thinking "I have to try that!" as I look through the entries.

I am hosting the Mixed Media/Art Journal challenge this month, and as it has been for the past year I invite you to submit any and all of your mixed media creations - layouts, cards, tags, art journal pages, off-the-page or altered projects, we'd love to see them all.

My art journal is a place of experimentation for me. Because it is a smaller canvas, and is essentially just for me, I can try out all sorts of different things without the worry of spoiling a layout or project I've spent hours (or days) on. This is where I try to figure out how other artists have accomplished specific effects, or try to figure out how to do something I've seen in a tutorial using the supplies I have to hand.

The art journal page I'm sharing today is one of those trial pages. I have a slew of Gelli plate monoprints from a class I did just sitting in a file folder waiting for me to do something with them. For this page I decided to glue them into my Dylusions journal - the journal pages were bigger than my prints, so I cut two down and pasted them in.


I love the look of swirls and tracery in gel medium, and recently picked up a couple Catalyst scrapers I haven't had the chance to try out. I also have a pot of Viva Crystal Gel sitting unused, and decided to pull it out. I have no idea why, but every time I use it I get a crackle effect, which I used to my advantage here. I painted on a thick layer of the Crystal Gel across the background, then dragged through it in various patterns and let it dry.


Once dried, I painted on Splash of Color Primary Elements mixed with water in various colours, making sure to work it into the cracks.

This was just a trial page, so I don't have any sayings or stamping in mind for it and will probably leave it as is - I love the depth of colour and the way it sparkles.

You can enter as many projects as you'd like, otherwise our Standard Challenge Rules are in effect.

Challenge closes at 8pm EST on January 14th, 2014.

Here is the wonderful RAK that is up for grabs:


I'm looking forward to seeing what you create. Thank you for all the inspiration you've shared over the past year!

Saturday, December 14, 2013

Mixed Media Card Challenge at Flying Unicorn

It's my turn to host the mid-month Card and Tag challenge at Flying Unicorn this month, and my challenge to you is to make a mixed media card or tag. That's right, it's time to apply the inky, painty mixed media techniques we love to use on art journal pages and layouts to our cards and tags.

I used scraps from the December Magic kit of the month. I'm down to scraps, and what better way to use those up than by whipping up a couple of cards?


I love the star diecut paper from the Pink Paislee Color Wash collection, and wanted to build on the star theme. I started off by gessoing the entire piece, then stencilled on the stars using a Tim Holtz layering stencil.


Once dry I went in with some Lindy's Stamp Gang sprays which I painted on. I repeated the same process with the Kaisercraft paper in the background to marry the two lines together. Some stamping, washi tape and string completed the card.


The rules this month are simple - use at least two different types of media on your background. Other than that, any card or tag is eligible (subject to our Standard Challenge Rules).

Here is the fantastic RAK Flying Unicorn has provided:


I hope you'll play along!

Supplies

From the kit:

- Kaisercraft Enchanted Garden "Magic"
- Pink Paislee Color Wash "Bright"
- Darice Wood Fence
- Prima Flowers: "Carbriole Aqua"

From my stash:

- Prima Bellas: Pink
- Doodlebug twine
- Prima stamp
- Tim Holtz Tissue Tape
- Tim Holtz Layering Stencil: Stars
- Gesso
- Lindy's Stamp Gang: "Sea Grass Green" & "Salt Water Taffy"

Sunday, December 8, 2013

Prima November PPP - Better Late Than Never!

I'm back with another share today, this time of the layout I prepared for the Prima November PPP. I meant to get it posted before the challenge closed, but we were hosting my dad's birthday and once things settled down it was too late, so I figured I would hold off on posting to get better pictures. And that took a week - things are really starting to slow down here with the holidays approaching. Evan and I are lucky to have 2 weeks off at Christmas while the boys are off school, and following our Christmas celebrations in town we will be heading up to my lovely in-laws' cabin at Whistler where 14 of us (!) will be spending 9 days together. As you can imagine, there won't be a lot of crafting space (though I did consider setting up a little desk in the closet in our room LOL.

This is my first time playing along with Prima Product Picks. Colour challenges intimidate me, but I was game to give this one a try as I love that Prima gives you not only a colour palette but also suggestions of products to use - and I just so happened to have quite a few of these in my stash. I also had a piece of 
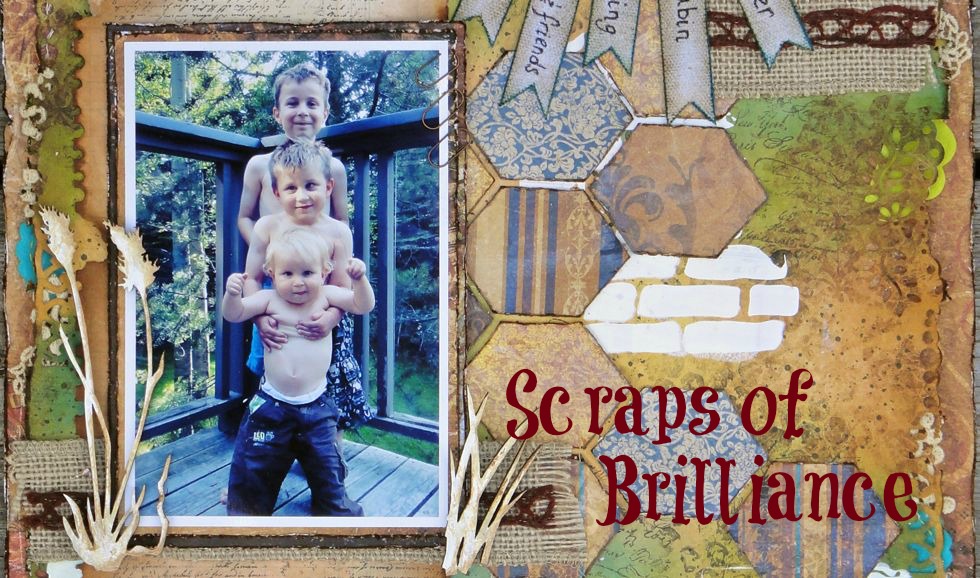
Blue Fern Studios chipboard and a recent picture of Elliot and Brennan that suited each other perfectly and couldn't wait to use them.

I have been loving Prima's Sunrise Sunset collection recently, and it again formed the basis for my layout.


I began by stencilling the woodgrain in with gesso, and while the gesso was still wet I sprinkled in Aged Scarlet Embossing Enamel and gold microbeads then heat set it all.


I wanted the Blue Fern Studios Seasonal Wildflowers chippy to look like the corn stalks in the photo. I started by cutting the chippy in two and wetting it then peeling apart the layers to give it a tatty look. I then coated everything with gesso, followed by Shabby Tote Chalk Edger and random spots of embossing enamel in Aged Ivory and Aged Gold.


The bow and laces for the buttons are the torn off edges from the resist canvas, dipped in coffee.

I painted the metal frame with Silks, then added some gold embossing powder and heat set it for some cool texture.


The flowers and butterflies are painted with Stickles to tie them together with the Lucido flowers.

Thank you for stopping by today!

Supplies:

Prima Products:

- Sunrise Sunset: Corona, White Hot
- Craftsman: Mechanic
- Lifetime: Love Tags
- Chalk Edger: Shabby Tote, Brick Wall, Coltsfood Stemens, Branch Bark
- Resist Canvas: Checkers
- Lifetime metal frames
- Lucido flowers
- Perdu flowers
- Charlotte flowers
- Bark Butterflies
- Woodgrain 12x12 stencil
- Hex Net stamp
- Lifetime Wooden Buttons
- Checker Stamp
- Checker 12x12 stencil
- Poppies and Peonies 6x6 Turkish Grunge stencil

- Blue Fern Studios: Seasonal Wildflowers
- Gesso
- Coffee
- Stampendous Embossing Enamel: Aged Scarlet, Aged Gold, Aged Ivory
- Wow! Gold Microbeads
- Silks acrylic paints: Ginger Peach, Jasmine & Blue Flame (mixed together to form the purple)
- Distress Paint: Picket Fence
- Stickles: Diamond
- Distress Ink: Rusty Hinge

Wednesday, December 4, 2013

"Magic" Altered Photo Box & Video

It's my turn on the Flying Unicorn Today post, and I am sharing my Off-The-Page project from the December "Magic" Kit of the Month, and a step-by-step video on how I put this project together.


The cute little fairies on the Kaisercraft Enchanted Garden papers were just too good to pass up, and I made them the focus of my fantastical shadow box.


Thanks for watching!

Supplies:

From the Kit of the Month:

- Kaisercraft Enchanted Garden "Rapture" & "Magic"
- Darice fence

From my Stash:

- Media: Glass Beads Gel, Gesso, Vintage White Acrylic
- Shimmerz Texturez: Sandy Stone, Artie-Choked & Patina
- Shimmerz Dazzlerz: Sour Apple
- Magenta Nature Elements mask
- Shimmerz mists: Pop Art Pink, Sea Foam, Bed of Roses
- Prima stencils: 12x12 Scales, 6x6 Poppies and Peonies

Monday, December 2, 2013

"Magic" Kit Reveal - Part 3

Did you have a good weekend? Ours seems like it was jam-packed, but I don't know if I accomplished much, and it's only going to get more crazy as December marches on. We did have a lovely roast beef dinner for my dad's birthday (and a couple lovely bottles of wine), and today the kids painted some Christmas ornaments and we made cookie dough to roll out later. Oh, and I finalized several of the details for my upcoming trip to CHA (and Disneyland with the family) in January!

Here is my third layout for the December kit of the month. I will be back on Thursday with my off-the-page project, including a start-to-finish video.


Have I told you lately how much I love the Marion Smith Nirvana papers? LOL - this is my third time making a layout with this specific piece of paper - I've used each side separately before, so why not cut it in half and use both sides simultaneously this time?


To tie the two sides of the paper together, I started off by stencilling with a damask mask on the turquoise side to mirror the one on the tan side. 


I then layered the wood veneer letters haphazardly on the diagonal, and went to town with Gelatos before finishing off the background with Spun Sugar Dazzlerz through a crackle mask.


I love these enamelled metal dangles and aged them further using the Whitewashed Pine set from Tattered Angels so they would coordinate with the paper colours.


Some stamping, loose threads and Dimensionz from the kit to finish everything off, combined with the gorgeous flowers from the Flower Add-On.


Thanks for stopping by - I hope this is the beginning of a wonderful week for you.

Supplies

From the kit of the month and add-ons:

- Marion Smith Nirvana: "Cloud 9" & "Photo Op"
- Kaisercraft Enchanted Garden: "Magic"
- Prima Resist Canvas Borders
- Trim
- Prima Veneer letter
- Darice Fence
- Maya Road clock transparencies
- Prima flowers: "Charlotte", "Lucido", "Queen Mary"

From my stash:

- Tattered Angels: Weathered Pine paint system
- Shimmerz Seafoam
- Gelatos
- Prima Damask 12x12 stencil
- Gesso
- Kaisercraft "Script" and "Grunge" stamps
- Faber-Castell Artist Pitt-Pens - XS Black

Sunday, December 1, 2013

Kit of the Month Reveal - Part 2

I'm back today with another layout from the December Flying Unicorn kit of the month, the aptly named "Magic".

I shifted gears a bit this time - the background is still mixed media, but the colour scheme is much more subdued - and I like it. The soft pinks and greens really let this family photo shine. This is one of those scrap-worthy photos I've been hoarding for ever, waiting for the right project to highlight it. This is Evan and I before our 10 year high school reunion, when Elliot was only about 18 months old.


I liked the subtle butterflies on the Kaisercraft "Fascinate" paper, so I added some extra butterflies to the background, then built it up with overlapping layers of paper strips, more stamping, Shimmerz mists, stencilling with Shimmerz Texturez, heat embossing and finally some painting with good old fashioned coffee.


I sprinkled some gold embossing powder into the Texturez while it was still wet.


 I love these Prima zipper flowers - so soft and yet so striking! The Bo Bunny wooden clocks were finished with Distress Ink and randomly sprinkled with embossing enamel.


A couple more closeups:


Thank you for stopping by!

Supplies

From the Kit:

- Kaisercraft Enchanted Garden: "Fascinate", "Rapture", Charm", "Entrance"
- Marion Smith Designs Nirvana: "Cloud 9"
- Prima Resist Canvas
- Petaloo Flowers: Mini Textured Elements
- Kaisercraft Wooden Clocks
- Prima Flowers: Queen Mary Vintage 

From my Stash:

- Gesso
- Coffee
- Stampendous Butterflies stamp
- Shimmerz mists: Pop Art Pink, Olive Branch & Seafoam